
Power your paddle sports with three great exercises

On the Gulf Coast of Florida where I live, the telltale sign of summer is not an influx of beachcombers, afternoon storms that arrive exactly at 2 p.m., or the first hurricane warning, but the appearance of hundreds of paddleboarders dotting the inlet waters.
From afar, paddleboarding looks almost spiritual — people standing on nearly invisible boards and gliding across the surface as if walking on water.
But this popular water sport offers a serious workout, just as kayaking and canoeing do. While floating along and casually dipping a paddle in the water may look effortless, much goes on beneath the surface, so to speak.
As warm weather beckons and paddle season arrives, it pays to get key muscles in shape before heading out on the water.
Tuning up muscles: Focus on core, back, arms, and shoulders
“Paddling a kayak, canoe, or paddleboard relies on muscles that we likely haven’t used much during winter,” says Kathleen Salas, a physical therapist with Spaulding Adaptive Sports Centers at Harvard-affiliated Spaulding Rehabilitation Network. “Even if you regularly weight train, the continuous and repetitive motions involved in paddling require endurance and control of specific muscles that need to be properly stretched and strengthened.”
While paddling can be a whole-body effort (even your legs contribute), three areas do the most work and thus need the most conditioning: the core, back, and arms and shoulders.
- Core. Your core comprises several muscles, but the main ones for paddling include the rectus abdominis (that famed “six-pack”) and the obliques, located on the side and front of your abdomen. The core acts as the epicenter around which every movement revolves — from twisting to bending to stabilizing your trunk to generate power.
- Back: Paddling engages most of the back muscles, but the ones that carry the most load are the latissimus dorsi muscles, also known as the lats, and the erector spinae. The lats are the large V-shaped muscles that connect your arms to your vertebral column. They help protect and stabilize your spine while providing shoulder and back strength. The erector spinae, a group of muscles that runs the length of the spine on the left and right, helps with rotation.
- Arms and shoulders: Every paddle stroke engages the muscles in your arms (biceps) and the top of your shoulder (deltoids).
Many exercises specifically target these muscles, but here are three that can work multiple paddling muscles in one move. Add them to your workouts to help you get ready for paddling season. If you haven’t done these exercises before, try the first two without weights until you can do the movement smoothly and with good form.
Three great exercises to prep for paddling
Wood chop
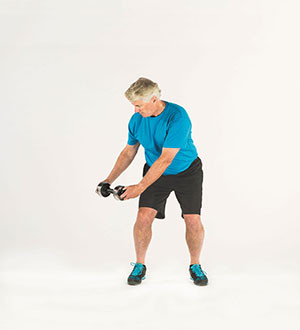
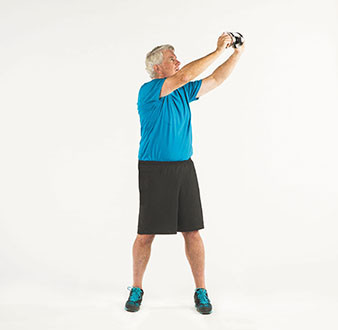
Muscles worked: Deltoids, obliques, rectus abdominis, erector spinae
Reps: 8–12 on each side
Sets: 1–3
Rest: 30–90 seconds between sets
Starting position: Stand with your feet about shoulder-width apart and hold a dumbbell with both hands. Hinge forward at your hips and bend your knees to sit back into a slight squat. Rotate your torso to the right and extend your arms to hold the dumbbell on the outside of your right knee.
Movement: Straighten your legs to stand up as you rotate your torso to the left and raise the weight diagonally across your body and up to the left, above your shoulder, while keeping your arms extended. In a chopping motion, slowly bring the dumbbell down and across your body toward the outside of your right knee. This is one rep. Finish all reps, then repeat on the other side. This completes one set.
Tips and techniques:
- Keep your spine neutral and your shoulders down and back
- Reach only as far as is comfortable.
- Keep your knees no farther forward than your toes when you squat.
Make it easier: Do the exercise without a dumbbell.
Make it harder: Use a heavier dumbbell.
Bent-over row
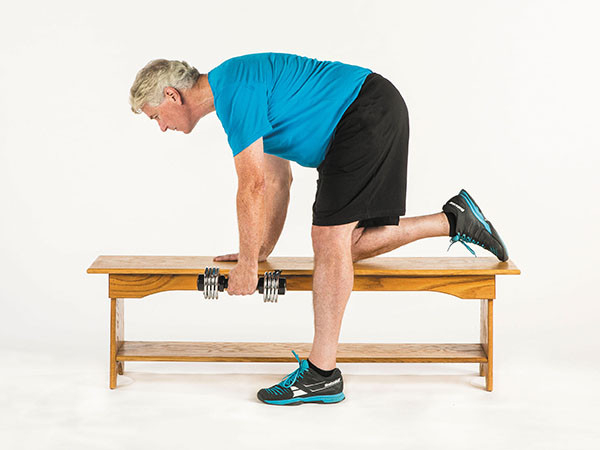
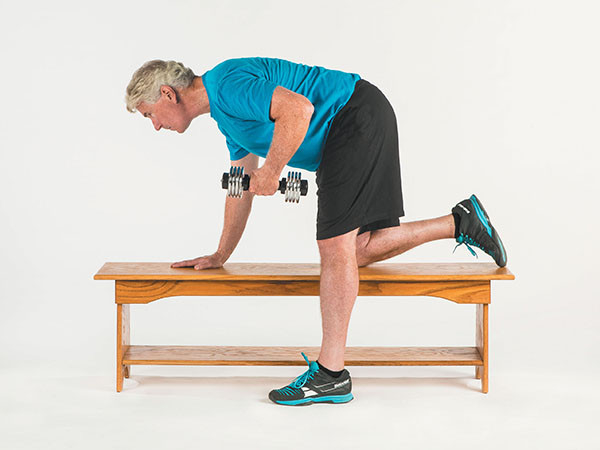
Muscles worked: Latissimus dorsi, deltoids, biceps
Reps: 8–12
Sets: 1–3
Rest: 30–90 seconds between sets
Starting position: Stand with a weight in your left hand and a bench or sturdy chair on your right side. Place your right hand and knee on the bench or chair seat. Let your left arm hang directly under your left shoulder, fully extended toward the floor. Your spine should be neutral, and your shoulders and hips squared.
Movement: Squeeze your shoulder blades together, then bend your elbow to slowly lift the weight toward your ribs. Return to the starting position. Finish all reps, then repeat with the opposite arm. This completes one set.
Tips and techniques:
- Keep your shoulders squared throughout.
- Keep your elbow close to your side as you lift the weight.
- Keep your head in line with your spine.
Make it easier: Use a lighter weight.
Make it harder: Use a heavier weight.
Superman
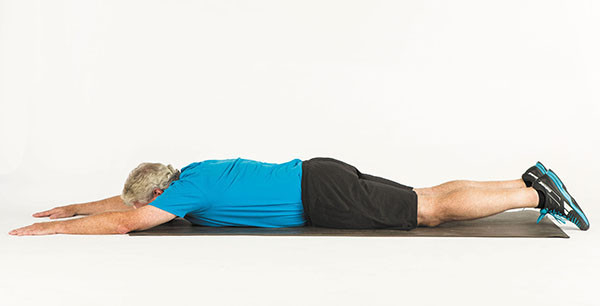
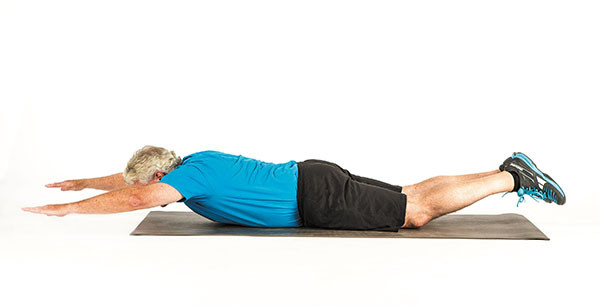
Muscles worked: Deltoids, latissimus dorsi, erector spinae
Reps: 8–12
Sets: 1–3
Rest: 30–90 seconds between sets
Starting position: Lie face down on the floor with your arms extended, palms down, and legs extended.
Movement: Simultaneously lift your arms, head, chest, and legs off the floor as high as is comfortable. Hold. Return to the starting position.
Tips and techniques:
- Tighten your buttocks before lifting.
- Don’t look up.
- Keep your shoulders down, away from your ears.
Make it easier: Lift your right arm and left leg while keeping the opposite arm and leg on the floor. Switch sides with each rep.
Make it harder: Hold in the “up” position for three to five seconds before lowering.
About the Author

Matthew Solan, Executive Editor, Harvard Men's Health Watch
Matthew Solan is the executive editor of Harvard Men’s Health Watch. He previously served as executive editor for UCLA Health’s Healthy Years and as a contributor to Duke Medicine’s Health News and Weill Cornell Medical College’s … See Full Bio View all posts by Matthew Solan
About the Reviewer

Howard E. LeWine, MD, Chief Medical Editor, Harvard Health Publishing
Dr. Howard LeWine is a practicing internist at Brigham and Women’s Hospital in Boston, Chief Medical Editor at Harvard Health Publishing, and editor in chief of Harvard Men’s Health Watch. See Full Bio View all posts by Howard E. LeWine, MD

Have you exfoliated lately?

Social media has a way of making the ho-hum seem fresh and novel. Case in point: exfoliation, the process of removing dead cells from the skin’s outer layer. Anyone scrolling through TikTok lately might be convinced this longtime skin care approach can transform something old — let’s say our aging epidermis — into like-new skin.
But a Harvard dermatologist says that’s asking too much.
“I don’t think exfoliation is going to fix anybody’s wrinkles,” says Rachel Reynolds, MD, interim chair of dermatology at Harvard-affiliated Beth Israel Deaconess Medical Center. While exfoliation offers definite benefits, it can also irritate and inflame the skin if you don’t do it carefully, or use tools or chemicals your skin doesn’t tolerate.
How is exfoliation done?
There are two main ways to exfoliate: mechanical and chemical. Each boasts specific advantages.
- Mechanical (or physical) exfoliation uses a tool such as a brush or loofah sponge, or a scrub containing abrasive particles, to physically remove dead skin cells. “Mechanical exfoliation can improve skin luster by taking off a dead layer of skin that can make it look dull,” Dr. Reynolds says. “And it can help unclog pores a bit, which can reduce some types of acne.”
- Chemical exfoliation uses chemicals — often alpha and beta hydroxy acids or salicylic acid — to liquify dead skin cells. “Chemical exfoliants work on a more micro-level to help dissolve excess skin cells and reduce uneven pigmentation sitting at the surface of the skin,” she explains. “They also restore skin glow, improve acne, and give the skin a little more shine.”
Why do skin care products so often promote exfoliation?
Perhaps hundreds of commercially available skin care products — from body washes to cleansers to face masks — are labeled as exfoliating, Dr. Reynolds notes. But she’s skeptical about why such a wide array of items plug this feature so prominently.
“It’s advantageous for a cosmetics company to sell consumers more products in a skin care line,” she says. “But it’s buyer beware, because this is a completely unregulated market, and cosmetic companies can make claims that don’t have to be substantiated in actual clinical trials.”
Do we need to exfoliate our skin?
No. “Nothing happens if you don’t exfoliate — you just walk around with bumpy or slightly dry skin, which is inconsequential except for cosmetic reasons,” Dr. Reynolds says.
“No one has to exfoliate, but it can be helpful to exfoliate the arms and legs,” she adds. “As we age, these areas get more dry than other parts of the body, and people notice they build up a lot more flaking skin and an almost fish-scale appearance.”
That phenomenon may or may not be a sign of keratosis pilaris, a common but harmless skin condition characterized by rough, bumpy “chicken skin” on the upper arms and thighs. Physical exfoliators are a good first choice because keratosis pilaris covers areas that have tougher skin than the face, she says. But it’s fine to use a cleanser or lotion containing a chemical exfoliant instead. Either type can improve skin texture and the skin’s appearance.
Can exfoliation harm our skin?
Yes. Both physical and chemical exfoliation techniques can do more harm than good, depending on several factors. Sensitive skin is more likely to become irritated or inflamed by any exfoliant. And overdoing it — whether by rubbing too hard or using a product with higher concentrations of acid — can trigger irritant contact dermatitis, which can look red, angry, and chapped.
“Physical exfoliation that’s done too harshly can also aggravate inflammatory acne, making it worse,” Dr. Reynolds says. “Also, exfoliating can make you more prone to sunburn.”
What are the safest ways to exfoliate?
Dr. Reynolds recommends chemical exfoliants over physical versions. “Sometimes the abrasives in those apricot scrubs, for example, can go too far, aggravating the skin and creating inflammation,” she says.
She offers these additional tips to exfoliate safely:
- If you haven’t exfoliated before, start with a simple washcloth to determine how well your skin responds to mild attempts at physical exfoliation.
- Then try gentler chemical exfoliants, such as lower concentrations of hydroxy acids or salicylic acid. Work your way up to stronger concentrations only if needed.
- If you’re hoping to eradicate stubborn skin problems such as melasma (brown facial patches) or comedonal acne (small, skin-colored bumps often on the forehead or chin), consider undergoing a chemical peel at a dermatologist’s office.
Don’t exfoliate every day. “At most, do it two or three times a week,” Dr. Reynolds says. “Your skin needs to repair itself in between exfoliation episodes.”
About the Author

Maureen Salamon, Executive Editor, Harvard Women's Health Watch
Maureen Salamon is executive editor of Harvard Women’s Health Watch. She began her career as a newspaper reporter and later covered health and medicine for a wide variety of websites, magazines, and hospitals. Her work has … See Full Bio View all posts by Maureen Salamon
About the Reviewer

Howard E. LeWine, MD, Chief Medical Editor, Harvard Health Publishing
Dr. Howard LeWine is a practicing internist at Brigham and Women’s Hospital in Boston, Chief Medical Editor at Harvard Health Publishing, and editor in chief of Harvard Men’s Health Watch. See Full Bio View all posts by Howard E. LeWine, MD